Kankin Linux on the Raspberry pi: mudanças entre as edições
Sem resumo de edição |
|||
| Linha 1: | Linha 1: | ||
Responsáveis: | Responsáveis: | ||
* [[Raphael Bastos - Coffnix|Raphael Bastos]] | * [[Raphael Bastos - Coffnix|Raphael Bastos]] | ||
* | * João Santos | ||
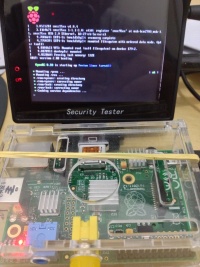
[[Image:Funtoo-linux-raspberrypi.jpg|thumb|200px|Kankin Linux on ARMv6 (Raspberry Pi)]] | [[Image:Funtoo-linux-raspberrypi.jpg|thumb|200px|Kankin Linux on ARMv6 (Raspberry Pi)]] | ||
| Linha 7: | Linha 7: | ||
Conseguimos homologar o Funtoo Linux no Raspberry Pi. A estabilidade e economia de consumo de recursos, já conhecida dos sistemas Gentoo se mantém nesse tipo de hardware. | Conseguimos homologar o Funtoo Linux no Raspberry Pi. A estabilidade e economia de consumo de recursos, já conhecida dos sistemas Gentoo se mantém nesse tipo de hardware. | ||
Conheça | Conheça nossa distribuição oficial, nascida dentro do Área 31 Hackerspace: | ||
https://sourceforge.net/projects/kankin/ | https://sourceforge.net/projects/kankin/ | ||
Assista um vídeo do sistema funcionando: | Assista um vídeo do sistema funcionando: | ||
| Linha 19: | Linha 16: | ||
__TOC__ | __TOC__ | ||
== Instale a imagem para oficial Raspberry Pi do Área 31 Hackerspace - Kankin Linux == | |||
Download do stage4 oficial Área 31 Hackerspace: | |||
https://sourceforge.net/projects/kankin/files/arm-v6/raspberry-pi/stage4/ | |||
=== Instale a última versão do Portage === | |||
wget http://distfiles.gentoo.org/snapshots/portage-latest.tar.bz2 | |||
tar xjvpf portage-latest.tar.bz2 -C /tmp/funtoo-raspberrypi/usr | |||
==== Sincronize a árvore do portage ==== | |||
eix-sync | |||
=== Senha de root padrão === | |||
A senha de root padrão da imagem oficial do Área 31 Hackerspace é: | |||
area31 | |||
== Instalando Funtoo Linux em Raspberry Pi a partir do stage3 oficial == | |||
Recomendamos que todo o processo seja realizado no disco local, e apenas no final seja copiado para o SD Card em si. Por questões de praticidade e desempenho. ;) | |||
=== Obtenha o stage3 oficial do Funtoo Linux compilado para ARM === | |||
wget http://ftp.osuosl.org/pub/funtoo/funtoo-current/arm-32bit/armv6j_hardfp/stage3-latest.tar.xz | |||
=== Descompacte o stage 3 oficial === | |||
mkdir -p /tmp/funtoo-raspberrypi | |||
tar xavpf stage3-armv6j_hardfp-funtoo-current-*.tar.xz -C /tmp/funtoo-raspberrypi | |||
=== Instale a última versão do Portage === | |||
wget http://distfiles.gentoo.org/snapshots/portage-latest.tar.bz2 | |||
tar xjvpf portage-latest.tar.bz2 -C /tmp/funtoo-raspberrypi/usr | |||
=== Instale o Kernel Linux e os modulos === | |||
A Fundação Raspberry Pi mantém uma árvore do kernel do Linux que pode ser executado no Raspberry Pi (hardware), incluindo uma versão pré-compilada que usamos aqui. siga os passos abaixo: | |||
cd /tmp/ | |||
git clone --depth 1 git://github.com/raspberrypi/firmware/ | |||
cp firmware/boot/* /tmp/funtoo-raspberrypi/boot | |||
cp -r firmware/modules /tmp/funtoo-raspberrypi/lib | |||
=== Edite o /etc/fstab === | |||
Configure o seu de forma parecida. Respeitando o seu esquema de particionamento e o(s) sistema(s) de arquivo(s) utilizado(s). | |||
vi /tmp/funtoo-raspberrypi/etc/fstab | |||
<pre> | |||
/dev/mmcblk0p1 /boot vfat noauto,noatime 1 2 | |||
/dev/mmcblk0p2 none swap sw 0 0 | |||
/dev/mmcblk0p3 / ext4 nobarrier,noatime 0 1 | |||
</pre> | |||
'''Dica:''' /dev/mmcblk'''0'''p'''1''' equivale a /dev/sda1 | |||
=== Crie o arquivo cmdline.txt === | |||
Crie a linha com os parâmetros de boot do kernel | |||
vi /tmp/funtoo-raspberrypi/boot/cmdline.txt | |||
Com o seguinte conteúdo: | |||
dwc_otg.lpm_enable=0 console=ttyAMA0,115200 kgdboc=ttyAMA0,115200 console=tty1 root=/dev/mmcblk0p3 rootfstype=ext4 elevator=deadline rootwait | |||
=== Configure o timezone === | |||
Ative o timezone atual: | |||
cp /tmp/funtoo-raspberrypi/usr/share/zoneinfo/America/Sao_Paulo /tmp/funtoo-raspberrypi/etc/localtime | |||
Configure o timezone default: | |||
echo "America/Sao_Paulo" > /tmp/funtoo-raspberrypi/etc/timezone | |||
=== Ative acesso de root sem senha === | |||
vi /tmp/funtoo-raspberrypi/etc/shadow | |||
Remova o asterisco, e deixe dessa forma a linha referente ao usuário '''root''': | |||
root::10770:0::::: | |||
==== Ou crie uma senha de root (opcional) ==== | |||
Em primeiro lugar, gere um hash de senha. A saída deste comando será usado para modificar o arquivo /etc/shadow. | |||
openssl passwd -1 | |||
ou | |||
python -c "import crypt, getpass, pwd; print crypt.crypt('password', '\$6\$SALTsalt\$')" | |||
Adicione o hash em '''SUA_PASSWORD_MD5''' | |||
vi /tmp/funtoo-raspberrypi/shadow | |||
root:SUA_PASSWORD_MD5:14698:0::::: | |||
=== Configure a rede (opcional) === | |||
Configure seguindo a documentação oficial Funtoo: | |||
http://www.funtoo.org/wiki/Funtoo_Linux_Networking | |||
=== Copie os arquivos para o SD Card === | |||
Monte o SD Card: | |||
mount /dev/mmcblk0p3 /mnt/sdcard | |||
mount /dev/mmcblk0p1 /mnt/sdcard/boot | |||
Sincronize os arquivos para o cartão: | |||
rsync -avzh /tmp/funtoo-raspberrypi/ /mnt/sdcard | |||
Desmonte e remova o cartão: | |||
umount /mnt/sdcard/boot /mnt/sdcard | |||
Seja feliz! :D | |||
Qualquer dúvida, nos procure no IRC ou na lista de discussão. | |||
== Configure o Cross-Compiling == | |||
Utilizaremos o overlay ambro-cross, visto que é bem estável. Mais infos: | |||
https://code.google.com/p/ambro-cross-overlay/wiki/Instructions | |||
=== Server/node cluster distcc (compilação distribuída) === | |||
Configure o ambiente para compilação cruzada: | |||
cd /usr/local | |||
svn checkout https://ambro-cross-overlay.googlecode.com/svn/trunk/ ambro-cross-overlay | |||
Adicione ao seu make.conf: | |||
<pre> | |||
PORTDIR_OVERLAY=" | |||
/usr/local/portage-crossdev | |||
/usr/local/ambro-cross-overlay" | |||
</pre> | |||
=== Converta o diretório /etc/portage === | |||
==== Crie um script para converter o /etc/portage para o padrão de diretórios ==== | |||
vi ~/convert-profile-to-files.sh | |||
<pre> | |||
#!/bin/bash | |||
PROFILE_DIR="/etc/portage" | |||
if [ ! -e ${PROFILE_DIR} ]; then | |||
mkdir ${PROFILE_DIR}; | |||
fi; | |||
for PACK_DIR in package.accept_keywords package.keywords package.use package.unmask package.mask; do | |||
CUR_DIR="${PROFILE_DIR}/${PACK_DIR}" | |||
if [ ! -e ${CUR_DIR} ]; then | |||
mkdir ${CUR_DIR} | |||
fi | |||
if [ -e ${CUR_DIR} -a ! -d ${CUR_DIR} ]; then | |||
mv ${CUR_DIR} ${CUR_DIR}.moving | |||
mkdir ${CUR_DIR} | |||
mv ${CUR_DIR}.moving ${CUR_DIR}/monolithic | |||
fi | |||
done | |||
echo "Completed!" | |||
</pre> | |||
==== Execute o script criado ==== | |||
chmod +x ~/convert-profile-to-files.sh | |||
bash ~/convert-profile-to-files.sh | |||
=== Instale o crossdev === | |||
Desmascare a última versão do crossdev: | |||
echo "sys-devel/crossdev" >> /etc/portage/package.keywords/monolithic | |||
=== Construa a ferramenta de compilação cruzada === | |||
mkdir /usr/local/portage-crossdev | |||
Compile o ambiente '''armv6j-hardfloat-linux-gnueabi''' usando o crossdev: | |||
crossdev --ov-output /usr/local/portage-crossdev --stable armv6j-hardfloat-linux-gnueabi | |||
== Instale os softwares == | |||
=== OctoPrint === | |||
====Instale as dependências==== | |||
===== Flask-principal ===== | |||
cd /opt ; git clone https://github.com/mattupstate/flask-principal.git | |||
cd flask-principal ; python setup.py install | |||
===== tornadIO2 ===== | |||
cd /opt ; git clone git://github.com/mrjoes/tornadio2.git | |||
cd tornadio2 ; python setup.py install | |||
===== Compile as dependências disponibilizadas no portage ===== | |||
emerge dev-python/pyyaml dev-perl/YAML-Syck www-servers/tornado dev-perl/yaml dev-python/flask-login dev-python/flask dev-python/itsdangerous dev-python/werkzeug dev-python/numpy media-video/mjpg-streamer dev-python/jinja virtual/python-json dev-python/simplejson dev-python/redis-py dev-python/pycurl dev-python/pyserial dev-python/blinker media-gfx/imagemagick dev-vcs/git | |||
===== instale o OctoPrint ===== | |||
cd /opt ; git clone https://github.com/foosel/OctoPrint.git | |||
==== Execute o OctoPrint ==== | |||
Execute como usuário pi: | |||
su - pi | |||
/opt/OctoPrint/run | |||
2013-09-09 03:25:58,887 - octoprint.server - INFO - Listening on http://0.0.0.0:5000 | |||
==== Acesse via browser ==== | |||
Acesse na porta 5000 o ip ao qual o raspberry está configurado: | |||
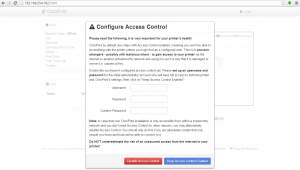
Caso surja uma tela solicitando criação de login, crie conforme desejado: | |||
[[Image:Octoprint-tela01.png|300px]] | |||
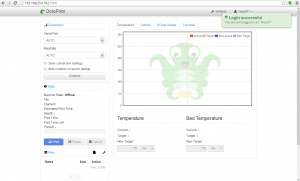
Após efetuar login, utilize seu OctoPrint: | |||
[[Image:Octoprint-tela02.png|300px]] | |||
= Controle de impressoras 3D usando Raspberry pi= | |||
Este projeto consiste no uso de hardware Raspberry Pi no controle, monitoramento e gerenciamento de impressoras 3D. | |||
http://www.youtube.com/watch?v=yHt1eRLJSaA | |||
== Servidor web octoprint == | |||
http://www.adafruit.com/blog/2013/02/14/untether-your-3-d-printer-with-a-35-raspberry-pi-3dthursday/ | |||
https://github.com/foosel/OctoPrint/wiki/Setup-on-a-Raspberry-Pi-running-Raspbian | |||
https://github.com/foosel/OctoPrint | |||
== Servidor web printerface == | |||
http://walter.schreppers.com/index.php?page=blogpost&pos=98 | |||
https://github.com/w-A-L-L-e/printerface | |||
= Referências = | |||
http://www.0x1.be/esa/dev/2013/04/20/raspberry-howto-linux-crosstool-ng/ | |||
http://www.bootc.net/archives/2012/05/26/how-to-build-a-cross-compiler-for-your-raspberry-pi/ | |||
http://archlinuxarm.org/forum/viewtopic.php?f=31&t=3849 | |||
https://wiki.gentoo.org/wiki/Distcc/Cross-Compiling | |||
http://jeremy-nicola.info/portfolio-item/cross-compilation-distributed-compilation-for-the-raspberry-pi/ | |||
http://wiki.gentoo.org/wiki/Raspberry_Pi_Kernel_Compilation | |||
http://wiki.gentoo.org/wiki/Raspberry_Pi_Cross_building | |||
http://forums.gentoo.org/viewtopic-p-7122062.html | |||
http://wiki.gentoo.org/wiki/Raspberry_Pi_Quick_Install_Guide#Overclocking | |||
http://wiki.gentoo.org/wiki/Raspberry_Pi_Kernel_Compilation | |||
== Funtoo Linux rodando em Raspberry pi == | |||
http://www.funtoo.org/wiki/Raspberry_Pi | |||
http://www.funtoo.org/wiki/Funtoo_Linux_Installation_on_ARM | |||
== Gentoo Linux rodando em Raspberry pi == | |||
http://wiki.gentoo.org/wiki/Raspberry_Pi | |||
Siga a documentação oficial do Gentoo, obedecendo as diferenças para o Funtoo: | |||
http://wiki.gentoo.org/wiki/Raspberry_Pi_Quick_Install_Guide | |||
Entenda a arquitetura ARM: | |||
http://linuxabordo.com.br/download/artigos/executando_linux_proc_arn_via_qemu.pdf | |||
== OpenSUSE Linux rodando em Raspberry pi == | |||
http://en.opensuse.org/openSUSE:Raspberry_Pi | |||
[[Categoria:Projetos]] | [[Categoria:Projetos]] | ||
[[Categoria:HardwareOpensource]] | [[Categoria:HardwareOpensource]] | ||
[[Categoria:SoftwareOpensource]] | [[Categoria:SoftwareOpensource]] | ||
Edição das 17h21min de 26 de outubro de 2013
Responsáveis:
* Raphael Bastos
* João Santos

Conseguimos homologar o Funtoo Linux no Raspberry Pi. A estabilidade e economia de consumo de recursos, já conhecida dos sistemas Gentoo se mantém nesse tipo de hardware.
Conheça nossa distribuição oficial, nascida dentro do Área 31 Hackerspace:
https://sourceforge.net/projects/kankin/
Assista um vídeo do sistema funcionando:
http://www.youtube.com/watch?v=CJ-P8O4USL8
Instale a imagem para oficial Raspberry Pi do Área 31 Hackerspace - Kankin Linux
Download do stage4 oficial Área 31 Hackerspace:
https://sourceforge.net/projects/kankin/files/arm-v6/raspberry-pi/stage4/
Instale a última versão do Portage
wget http://distfiles.gentoo.org/snapshots/portage-latest.tar.bz2
tar xjvpf portage-latest.tar.bz2 -C /tmp/funtoo-raspberrypi/usr
Sincronize a árvore do portage
eix-sync
Senha de root padrão
A senha de root padrão da imagem oficial do Área 31 Hackerspace é:
area31
Instalando Funtoo Linux em Raspberry Pi a partir do stage3 oficial
Recomendamos que todo o processo seja realizado no disco local, e apenas no final seja copiado para o SD Card em si. Por questões de praticidade e desempenho. ;)
Obtenha o stage3 oficial do Funtoo Linux compilado para ARM
wget http://ftp.osuosl.org/pub/funtoo/funtoo-current/arm-32bit/armv6j_hardfp/stage3-latest.tar.xz
Descompacte o stage 3 oficial
mkdir -p /tmp/funtoo-raspberrypi
tar xavpf stage3-armv6j_hardfp-funtoo-current-*.tar.xz -C /tmp/funtoo-raspberrypi
Instale a última versão do Portage
wget http://distfiles.gentoo.org/snapshots/portage-latest.tar.bz2
tar xjvpf portage-latest.tar.bz2 -C /tmp/funtoo-raspberrypi/usr
Instale o Kernel Linux e os modulos
A Fundação Raspberry Pi mantém uma árvore do kernel do Linux que pode ser executado no Raspberry Pi (hardware), incluindo uma versão pré-compilada que usamos aqui. siga os passos abaixo:
cd /tmp/
git clone --depth 1 git://github.com/raspberrypi/firmware/
cp firmware/boot/* /tmp/funtoo-raspberrypi/boot
cp -r firmware/modules /tmp/funtoo-raspberrypi/lib
Edite o /etc/fstab
Configure o seu de forma parecida. Respeitando o seu esquema de particionamento e o(s) sistema(s) de arquivo(s) utilizado(s).
vi /tmp/funtoo-raspberrypi/etc/fstab
/dev/mmcblk0p1		/boot		vfat		noauto,noatime	1 2
/dev/mmcblk0p2          none            swap            sw              0 0
/dev/mmcblk0p3		/		ext4		nobarrier,noatime		0 1
Dica: /dev/mmcblk0p1 equivale a /dev/sda1
Crie o arquivo cmdline.txt
Crie a linha com os parâmetros de boot do kernel
vi /tmp/funtoo-raspberrypi/boot/cmdline.txt
Com o seguinte conteúdo:
dwc_otg.lpm_enable=0 console=ttyAMA0,115200 kgdboc=ttyAMA0,115200 console=tty1 root=/dev/mmcblk0p3 rootfstype=ext4 elevator=deadline rootwait
Configure o timezone
Ative o timezone atual:
cp /tmp/funtoo-raspberrypi/usr/share/zoneinfo/America/Sao_Paulo /tmp/funtoo-raspberrypi/etc/localtime
Configure o timezone default:
echo "America/Sao_Paulo" > /tmp/funtoo-raspberrypi/etc/timezone
Ative acesso de root sem senha
vi /tmp/funtoo-raspberrypi/etc/shadow
Remova o asterisco, e deixe dessa forma a linha referente ao usuário root:
root::10770:0:::::
Ou crie uma senha de root (opcional)
Em primeiro lugar, gere um hash de senha. A saída deste comando será usado para modificar o arquivo /etc/shadow.
 openssl passwd -1
ou
python -c "import crypt, getpass, pwd; print crypt.crypt('password', '\$6\$SALTsalt\$')"
Adicione o hash em SUA_PASSWORD_MD5
vi /tmp/funtoo-raspberrypi/shadow
root:SUA_PASSWORD_MD5:14698:0:::::
Configure a rede (opcional)
Configure seguindo a documentação oficial Funtoo:
http://www.funtoo.org/wiki/Funtoo_Linux_Networking
Copie os arquivos para o SD Card
Monte o SD Card:
mount /dev/mmcblk0p3 /mnt/sdcard
mount /dev/mmcblk0p1 /mnt/sdcard/boot
Sincronize os arquivos para o cartão:
rsync -avzh /tmp/funtoo-raspberrypi/ /mnt/sdcard
Desmonte e remova o cartão:
umount /mnt/sdcard/boot /mnt/sdcard
Seja feliz! :D
Qualquer dúvida, nos procure no IRC ou na lista de discussão.
Configure o Cross-Compiling
Utilizaremos o overlay ambro-cross, visto que é bem estável. Mais infos:
https://code.google.com/p/ambro-cross-overlay/wiki/Instructions
Server/node cluster distcc (compilação distribuída)
Configure o ambiente para compilação cruzada:
cd /usr/local
svn checkout https://ambro-cross-overlay.googlecode.com/svn/trunk/ ambro-cross-overlay
Adicione ao seu make.conf:
PORTDIR_OVERLAY="
/usr/local/portage-crossdev
/usr/local/ambro-cross-overlay"
Converta o diretório /etc/portage
Crie um script para converter o /etc/portage para o padrão de diretórios
vi ~/convert-profile-to-files.sh
#!/bin/bash
PROFILE_DIR="/etc/portage"

if [ ! -e ${PROFILE_DIR} ]; then
  mkdir ${PROFILE_DIR};
fi;

for PACK_DIR in package.accept_keywords package.keywords package.use package.unmask package.mask; do
  CUR_DIR="${PROFILE_DIR}/${PACK_DIR}"
  if [ ! -e ${CUR_DIR} ]; then
    mkdir ${CUR_DIR}
  fi

  if [ -e ${CUR_DIR} -a ! -d ${CUR_DIR} ]; then
    mv ${CUR_DIR} ${CUR_DIR}.moving
    mkdir ${CUR_DIR}
    mv ${CUR_DIR}.moving ${CUR_DIR}/monolithic
  fi
done

echo "Completed!"
Execute o script criado
chmod +x ~/convert-profile-to-files.sh
bash ~/convert-profile-to-files.sh
Instale o crossdev
Desmascare a última versão do crossdev:
echo "sys-devel/crossdev" >> /etc/portage/package.keywords/monolithic
Construa a ferramenta de compilação cruzada
mkdir /usr/local/portage-crossdev
Compile o ambiente armv6j-hardfloat-linux-gnueabi usando o crossdev:
crossdev --ov-output /usr/local/portage-crossdev --stable armv6j-hardfloat-linux-gnueabi
Instale os softwares
OctoPrint
Instale as dependências
Flask-principal
cd /opt ; git clone https://github.com/mattupstate/flask-principal.git
cd flask-principal ; python setup.py install
tornadIO2
cd /opt ; git clone git://github.com/mrjoes/tornadio2.git
cd tornadio2 ; python setup.py install
Compile as dependências disponibilizadas no portage
emerge dev-python/pyyaml dev-perl/YAML-Syck www-servers/tornado dev-perl/yaml dev-python/flask-login dev-python/flask dev-python/itsdangerous dev-python/werkzeug dev-python/numpy media-video/mjpg-streamer dev-python/jinja virtual/python-json dev-python/simplejson dev-python/redis-py dev-python/pycurl dev-python/pyserial dev-python/blinker media-gfx/imagemagick dev-vcs/git
instale o OctoPrint
cd /opt ; git clone https://github.com/foosel/OctoPrint.git
Execute o OctoPrint
Execute como usuário pi:
su - pi
/opt/OctoPrint/run
2013-09-09 03:25:58,887 - octoprint.server - INFO - Listening on http://0.0.0.0:5000
Acesse via browser
Acesse na porta 5000 o ip ao qual o raspberry está configurado:
Caso surja uma tela solicitando criação de login, crie conforme desejado:
Após efetuar login, utilize seu OctoPrint:
Controle de impressoras 3D usando Raspberry pi
Este projeto consiste no uso de hardware Raspberry Pi no controle, monitoramento e gerenciamento de impressoras 3D.
http://www.youtube.com/watch?v=yHt1eRLJSaA
Servidor web octoprint
http://www.adafruit.com/blog/2013/02/14/untether-your-3-d-printer-with-a-35-raspberry-pi-3dthursday/
https://github.com/foosel/OctoPrint/wiki/Setup-on-a-Raspberry-Pi-running-Raspbian
https://github.com/foosel/OctoPrint
Servidor web printerface
http://walter.schreppers.com/index.php?page=blogpost&pos=98
https://github.com/w-A-L-L-e/printerface
Referências
http://www.0x1.be/esa/dev/2013/04/20/raspberry-howto-linux-crosstool-ng/
http://www.bootc.net/archives/2012/05/26/how-to-build-a-cross-compiler-for-your-raspberry-pi/
http://archlinuxarm.org/forum/viewtopic.php?f=31&t=3849
https://wiki.gentoo.org/wiki/Distcc/Cross-Compiling
http://jeremy-nicola.info/portfolio-item/cross-compilation-distributed-compilation-for-the-raspberry-pi/
http://wiki.gentoo.org/wiki/Raspberry_Pi_Kernel_Compilation
http://wiki.gentoo.org/wiki/Raspberry_Pi_Cross_building
http://forums.gentoo.org/viewtopic-p-7122062.html
http://wiki.gentoo.org/wiki/Raspberry_Pi_Quick_Install_Guide#Overclocking
http://wiki.gentoo.org/wiki/Raspberry_Pi_Kernel_Compilation
Funtoo Linux rodando em Raspberry pi
http://www.funtoo.org/wiki/Raspberry_Pi
http://www.funtoo.org/wiki/Funtoo_Linux_Installation_on_ARM
Gentoo Linux rodando em Raspberry pi
http://wiki.gentoo.org/wiki/Raspberry_Pi
Siga a documentação oficial do Gentoo, obedecendo as diferenças para o Funtoo:
http://wiki.gentoo.org/wiki/Raspberry_Pi_Quick_Install_Guide
Entenda a arquitetura ARM:
http://linuxabordo.com.br/download/artigos/executando_linux_proc_arn_via_qemu.pdf
OpenSUSE Linux rodando em Raspberry pi
http://en.opensuse.org/openSUSE:Raspberry_Pi

